“Audibility always wins…” – Gus Mueller
Most experienced clinicians working in busy hearing aid clinics understand the truth of the above statement well. Of course, there’s only one way to ensure that your patient’s aided audibility is not only adequate but optimal – and that is to measure it using real-ear measurement (REM). Below are ten tips to help you expedite, strengthen and refresh your fittings.
Note: If you’re not measuring your fittings, start now! Learn about 10 reasons why you should.
Speed-up your Fittings
(1) Pre-fit your hearing aids
Have you ever found yourself running late, stressed out, sitting in front of your patient at their fitting appointment, fumbling around while trying to read their new hearing aids into the software for the first time in order to assign R/L, set receiver strength, select acoustic options, etc.?
This looks unprofessional and can lead to fitting errors.
Instead, take a few minutes over lunch to “pre-fit” your hearing aids, which simply means setting all the fitting/acoustic parameters and running a basic “best-fit” on the devices so that they are ready to be placed into the client’s ears when they come in. This saves time at the fitting and reduces the potential for awkward moments in front of the client.
2) Use simultaneous binaural measurement
Most modern REM systems have the capability to perform simultaneous binaural measurements. Theoretically, this could cut your measurement time in half… however, in reality, it just speeds up the process.
For binaural measurements to work well, you need to make sure your patient and REM speaker are set up as far as possible from walls and other reflective surfaces, including yourself! This may require you to modify your space a little, but it will save you time later!
3) Use automated adjustments
Regardless of which hearing aids you like to fit and which REM system you use, automated real-ear measurement (auto-REM) is likely an option that is available to you. Most clinicians shy away from this tool due to unfamiliarity, but it is the easiest, fastest way to improve audibility for your patients.
Auto-REM is a game-changing technology, but it is not perfect. As such, I like to use a dual approach: I often use auto-REM to get the hearing aids mostly on prescriptive targets, then I run a few curves manually and make additional adjustments.
4) Network your equipment
It is a waste of time and energy to manually enter audiometric information into your REM system. If you are using Audioscan equipment (e.g. Verifit, Verifit2) solely as stand-alone units, be sure to connect your device to a network and pay the extra software licensing fee for the Audioscan Noah Module; it will change your life, I promise.
Of course, this is not an issue if you are using a computer-based system, such as the Aurical, Trumpet or Affinity.
Tighten-up your Fittings
5) Measure RECDs (on everybody)
When people think of measuring real-ear to coupler differences (RECDs), they often think of kids and test box fittings. However, whether you realize it or not, every time you run REM with your patients you are using an RECD! Your REM system automatically uses an average RECD when converting the HL audiogram to the “SLPoGRAM” you see on your real-ear aided response (REAR) screen.
If you want your fitting to be more precise, you should measure an RECD on every single patient. This will make their hearing thresholds (and thus the corresponding prescriptive targets) more accurate.
6) Use probe tube placement assistance tools
The accuracy of your REM results depends heavily on good, deep probe tube placement. Whether you’re a newbie or a pro, probe tube placement tools allow you to feel confident in your curves because they confirm that the probe tube is within 5mm of the eardrum.
If your system has this feature (e.g. Verifit2, Aurical, and Affinity), you’re crazy not to use it, even if you’ve inserted thousands of probe tubes. If your REM system manufacturer doesn’t have this feature, reach out to them and request it!
7) Make manual adjustments (always)
The purpose of REM is not just to document how good or bad your “best-fit” settings are (though, using REM for only that is better than nothing!); it is to use these settings as a starting point to improve the audibility and comfort of the fitting for your client.
Sometimes you only need to make a few small tweaks, other fittings require significant adjustments to make the fitting appropriate.
Optimize the fitting for your patient; always make adjustments.
Modernize your fittings
8) Get a monitor (or two) – immediately!
We need to say good riddance to old-school clinical fitting set-ups, where we are furtively making adjustments on some unseen computer and the patient is just staring blankly at a loudspeaker.
Instead, get a big monitor and place it on your wall or desk so that your patient feels involved in the process. Let them see the changes you are making; put your hard work on display. Explain what you are doing and make the process transparent.
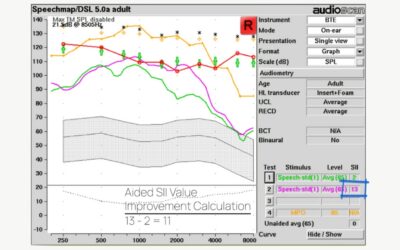
9) Use the SII to predict benefit
Most REM systems give you an automatic calculation of the aided Speech Intelligibility Index (SII), which is simply the percentage of speech that is audible to the patient for a given input level.
Perhaps more important than the aided SII value is the observed change in SII when taking a patient from unaided to aided, as it represents the improvement in audibility obtained in the fitting and can be used to predict patient benefit with amplification. You can download my Expected Benefit With Amplification Tool and use it in your clinic. This topic is so important, I dedicated a whole audiology online webinar to the topic.
10) Counsel with your REM results
REM is how we quantify our fittings and measure the improvement in audibility we are delivering with hearing aids; however, it is also a huge opportunity to help the patient understand how the hearing aids help them.
The aided response screen is where the client can visually see the improvement simultaneously as they hear it. Explain the results to the patient and show them how much the hearing aids are helping.
Conclusion
REM is an essential part of every hearing aid fitting. Start employing these tips right away to help you speed-up, tighten-up and modernize your fittings.
For more information on improving your hearing aid fittings, subscribe to Clayton’s YouTube Channel.
If you found this blog helpful, please share it on social media!