The ear impression is a template from which the custom ear product is built. Translation: high-quality ear impressions make high-quality products! Conversely, low-quality ear impressions result in high remake rates, lower clinic efficiency and profitability, and most importantly decreased client satisfaction. In this blog, we will share what makes a great ear impression, including equipment selection, technique tips, and impression assessment.
Ear Impression Best Practice
- Material: When considering impression materials, using polyvinyl siloxane is currently best practice and is the most popular impression material in use today. This two-part silicone comes in a variety of packaging options. Pay attention to the cure time – we recommend starting with a longer cure time for those new to practice, and to avoid shrinkage.
- Equipment: To perform impressions you need otoblocks, a syringe or a gun, an earlite, possibly a mixing instrument, and infection control supplies (i.e., PPE). Ensure you are using professional-grade products that are compliant with infection control best practices. Remember that anything that touches the client requires sterilization. Learn more about infection control here.
- Preparation: Otoscopy and an ear impression-specific case history are required prior to ear impression taking. A clear ear canal is key to obtaining a good ear impression. Do not continue with the impression if there is more than minimal cerumen present. Rule out any potential contraindications like foreign bodies, and assess the canal for proper otoblock size. Learn more about earwax removal here.
- Procedure: The procedure can be broken down into three parts: (1) inserting the otoblock and double checking its fit, (2) filling the ear with impression material, and (3) removing the impression and otoblock after it is cured. Best practice essentials here include but are not limited to: (1) ensuring the otoblock is securely and tightly inserted with no gaps on any side of the canal walls, and (2) bracing during both otoblock placement and insertion of the silicone material.
- Assessment: Every impression should be assessed for five important features prior to being sent out, which we list at the end of this blog.
For in-depth instruction on how to perform ear impressions to current best practices, a review of all equipment and material options, and so much more, check out our Ear Impression Training course!
Technique Tips
Here are some of my “tips and tricks” to getting the perfect ear impression:
- Depth matters– The deeper the insertion of the otoblock, the better! Capturing as much of the ear canal as possible makes the manufacturer’s job that much easier and, in turn, provides an exceptional product for your client.
- Flatten the otoblock – If using a cotton otoblock, pinch with your fingers to flatten the material depth-wise. This naturally allows for a deeper impression without the medial end actually going deeper. It also reduces the risk of any cotton material being left behind.
- Keep the tip in – When injecting the impression material, keep the tip of the syringe or gun inserted in the material as you are pulling back, this creates a nice smooth finish with no air bubbles in the impression or lumps in the final product.
- Fill the entire bowl – Lastly, and this may be the most important: fill the ENTIRE bowl, concha and don’t forget the helix! Even if you know your client does not want a full skeleton or a canal lock, for example, you want to ensure your impression is complete. Should you need modifications down the road, or your client needs more retention, you will not have to re-do the entire impression.
Assessment of The Ear Impression
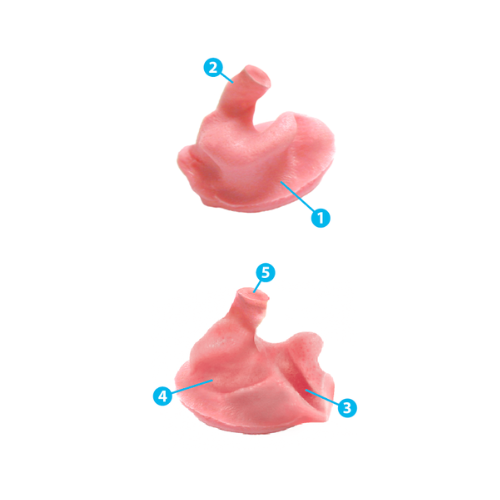
- Concha – Ensure that the concha is round and full, with no pockets or voids.
- Canal– The length of the canal portion of the impression should clearly show the second bend and extend slightly past it.
- Helix –The helix should be visible in the impression, including the tip of the helix.
- Tragus – Ensure the tragus is fully covered and you can clearly see the indentation left by it in the impression.
- Otoblock – Check that the otoblock has been imprinted completely across the canal tip.
If you found this blog helpful, please share it on social media!