Customized video content is a fantastic way for hearing care professionals to provide valuable educational content to their clients, whether it’s demonstrating how to use hearing aids, providing advice, or answering frequently asked questions. Video content is also a powerful tool to attract new clients through a clinic’s website, but in particular through social media. Here at Pacific Audiology Group, we know the power of good video content. This blog unpacks our own self-film kit, and how you could use a similar setup to easily film professional-quality how-to and marketing videos. Let’s get to it!
Film Setup
If you’re going to take the time to create marketing or instructional videos for your business, chances are you will be doing it on an ongoing basis, so they need to be of high quality. Do not record these with your 9-year-old web cam and computer’s built-in microphone! There are a lot of options when it comes to a camera setup. Essentially what you need is a professional setting to film in – usually your office, a camera, professional quality light, a professional quality microphone and, to really make things easier on you – a teleprompter. There are infinite ways to put all these together, and we’ve tried many, so let us show what we use when our course contributors need to film in their location, and not ours.
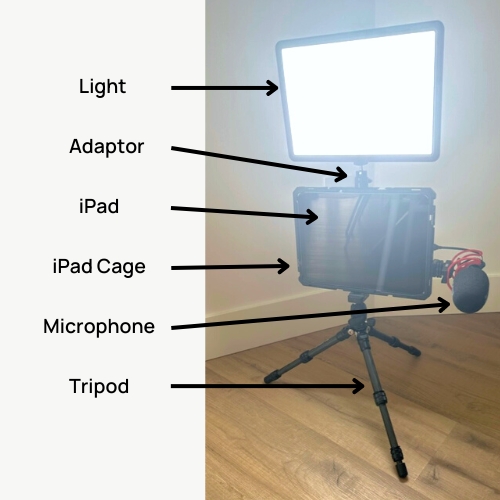
- Camera – For videos, you want to be recording in 1080p, which is the minimum resolution to qualify as high-definition or HD. For our self-film kit, we actually use the 10th generation iPad which importantly has a front camera that records in 1080p. We like this set up because it allows the subject to monitor themselves as they record, allowing for some adjustment, and the bonus is that your script can scroll on the screen using a teleprompting app.
- Tripod – Stability are camera angle are two keys to a quality recording, so you need a solid tripod to hold up the camera (iPad in this case), light, and microphone. We use the Oben CTT-1000 tripod.
- Light – A good light source is crucial. Lighting is one of the most important factors in video recording, being as important as the camera. You want to use a professional quality front light at a minimum. For our self-film kit, we use the Studio Panel Lighting Kit by Lume Cube. A ring light creates less uniform light, but this or a soft box are acceptable options depending on budget and space.
- Microphone – Audio quality is always important, and particularly so when the audience is hard of hearing. Separating the microphone from the camera helps to reduce peak clipping and creates a more balanced and authentic sound. We use the RODE VideoMic Go II which attaches to the iPad’s USB-C port.
- Accessories – Once you have the components above, you need ways to attach them all together to create a single, stable unit. This is done using some attachments. First, we use the Accsoon PowerCage II which is an aluminum frame which connects to the iPad and allows for the tripod, light, and microphone to attach directly to the iPad. We use what is called a cold shoe and a cold shoe adaptor to attach the microphone to the iPad.
Scripting
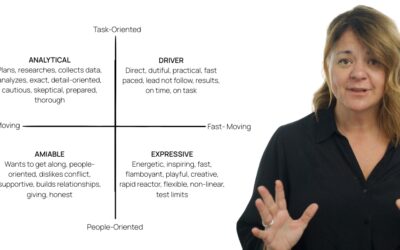
Next let’s talk about scripting, which is critical in my opinion. Your script should be clear, concise, and engaging while delivering the information your audience seeks. Always introduce yourself and the topic, and structure your content in a logical sequence. Use language that is easy to understand, avoid jargon when possible, and follow all health literacy guidelines. Also, be sure to stick to one main topic per video to prevent overloading your viewers with information. For video length, aim for three to five minutes for how-to videos. You are better off having several shorter videos than one long one. Attention spans are shortening these days and it is important to remain engaging and ensure viewers watch to the end. In terms of scripting, if the average person talks at a rate of 120 words per minute, then this would be 350 to 500 words.
Filming
Before you hit the record button, do a quick check of your audio and lighting. Make sure you’re clearly visible, and there is minimal background noise. Ensure you are centred in your frame, which usually means you are about arm’s length from the camera. Rehearse several times until you are comfortable with the cadence of your script.
When recording, try to maintain eye contact with the camera lens. This simulates direct eye contact with your viewers, making your video more engaging. Speak clearly and at a moderate pace. Be engaged, use hand motions, and give 110% of your personality. This can feel odd, but it makes viewing it easier. Don’t rush and remember that it’s okay to make mistakes. You can always pause and redo a section – that’s the magic of video editing!
Editing
There are many user-friendly apps available for editing like iMovie or LumaFusio that can help you stitch together your video clips, add text overlays, background music, and more. Start with basic cuts and transitions, and as you get more comfortable, experiment with more advanced features.
Publishing
Before you upload your video to YouTube or your website, make sure to create a catchy title and an informative description. Incorporate relevant keywords to help your video show up in search results. You should also add captions to your videos, making them accessible to people who are hard of hearing.
Remember, creating videos is a learning process. Don’t be discouraged if your first few videos aren’t perfect. With practice, you’ll become more comfortable on camera and your video quality will improve. The most important thing is the value you provide to your clients, helping them to better understand and manage their hearing care. Happy filming!
If you found this blog helpful, please share it on social media!